Wednesday, April 9, 2014

Quick Fix

Behold my much loved and awesome sketchbook. But there is only one problem with it.... 


Whenever I draw in it, and fold the previous page over to the back, this is what the back of the page will pick up. Dust, dirt, grime, etc. Not cool.


Behold my solution!


You know how sometimes paper packs or other items come with a piece of cardboard in the back? And you know how some of you like to save these? I raise my hand here as well since I do it too...


I cut the cardboard to size, and used a hole punch to make the spaces for the spiral ring binding. I then cut the space between the punches to the edge of the cardboard a little so they could easily be switched from page to page. 


Et, Voila! No more dirty pages. The cardboard piece is now at the back of the book while I draw. Added bonus? I always know exactly which page I am working on. It's like a gigantic tab. 


Coasters anyone?


On Amazon when you search for 'zentangle' you get about 20 pages worth of books and supplies. These coasters were one such supply. They are absorbant coasters for around $8 per set of 50. Of course I had to buy them as I was exploring these as an option for crafts this summer. 


The round coasters make the perfect zendala style zentangles.


And the square coasters make the perfect traditional zentangles. 

    
^Please note, the stain on this one is from my daughter spilling my coffee while I was tangleing, not a result of improper sealing.


Measuring about 4" in diameter or 4" square, these tiles are perfect coasters. But how do you protect your artwork? Well, simple, mod podge the top. Be sure to also get mod podge all around the edges too. Allow to dry. Using clear spray paint, seal the top. When this has fully dried you will have a waterproof coaster. No joke. This is the same method I use with tile coasters when I cover them with craft paper. But have fun. Make it your own! 


Did I mention you can tangle on your Starbucks cup too? hehe


Scratch art, not just for kids!

This box of 125 tiles cost a little over $8 on Amazon. I bought it to explore zentangle as a craft this summer at camp using the scratch art tiles. Little did I know how much I would enjoy it, let alone my 5 and 8 year olds. 

I always try to do at least a few example pieces to show the kids at camp. These were my attempts.


My kids had even more fun. You can totally tell which ones are my son's. But my daughter was there right with me tangling away! This was good for me to see. I know not every kid is going to want to tangle on these and I need to be ok with that. I outlined a leaf for my daughter and she took it and ran. Look at her pretty tangles down there in the left corner! 


So yeah, apparently this will be a hit this summer. The tiles are 3-1/2" square just like a zentangle tile and they take the guess work out of coloring. The best part for me though? No busted pens at the end of the summer. These are purely done with a wood stylus. Grab a box off Amazon and enjoy!


Challenge Accepted

Recently in my quest for the new camp crafts for this summer I came across the website tanglepatterns.com yet again. I have been fascinated by the zentangle method. It is both fun and relaxing for me. 


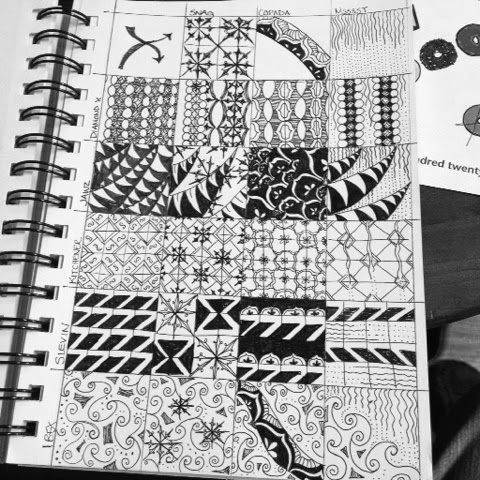
In my efforts to learn more about the multitude of patterns out there I have been doing the grid whereby you place three tangles across the top section, and three tangles along the side. As the tangles cross, you come up with a new way to use them. This has been a fascinating exercise. I feel like I have been both stretched and learned new tangles I would not normally have tried. 


While this exercise has proved helpful I also wanted to stretch my limits more. I purchased a 6x6 spiral ring sketchbook of 93lb paper. Having had the wonderful hubs buy me the "pre-strung" zendala tiles, I decided to set my own strings. 


Now, I mentioned the tanglepatterns.com website earlier. Linda Farmer does an awesome job of keeping it updated and running. I have added the link button to their website over on the right hand side of the blog here. One of the things she lists on the website is a section dedicated to strings. When you click on this you will see many different strings available. I believe there are over 90 different strings listed at this point. I simply went through and drew the strings I liked into my sketchbook so I would have many to choose from when inspiration struck. This has also been a fun challenge because I would not have thought of some of the string patterns that were offered. 


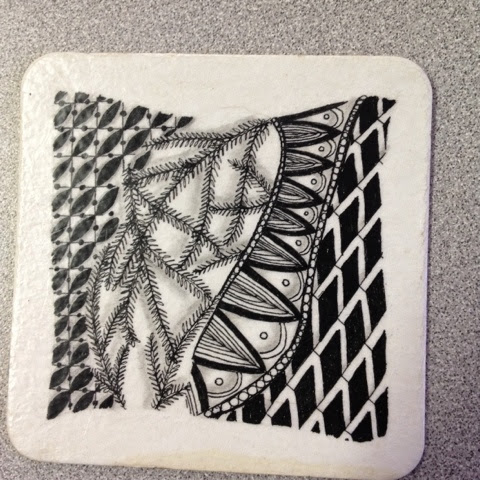
Offered for your enjoyment are three I have completed so far. 


This has been a joy and a challenge. I have been challenged in the sense that these strings are in a much larger format than I am used to. A traditional zentangle tile is usyally done on 3-1/2" square tiles. The tiles I cut and use from watercolor paper are actually a hair smaller at 3" square. Doubling the size has proved a great exercise. I have learned to enlarge the patterns I once drew so tiny. I have also been paying special attention to how the different tangles interact with each other. Whether they are meant to be more in the background or foreground, or how the shading will change the depth perception of some tangles. 

I will say it yet again, I am no Certified Zentangle Teacher, I have learned a lot from books and websites and I honestly would probably benefit greatly from sitting in a class under these talented people. I am just sharing again what I have been learning and loving. I hope you find enjoyment with it too. 

Wednesday, April 2, 2014

Book Look Update


I can't get enough of these. They are too much fun to make. I took some old books and turned them into more zentangle kits. 


This one is my favorite. It has multiple pockets for tangling cards and lots of space to hold as many pens or such as I would want. The cover is gorgeous paper I found and even the handwritten paper on the inside is from the same collection. The poem is "The Lark" by Sir Wiliam Davenport. I love it!


This was an old Reader's Digest from 1966. It's makeover is for my mother in law while she takes my father in law to chemo treatments. I know I spelled "mumsie" wrong for the tangle but it is actually perfect since Mumsie is mom's camp name. I will be bringing this to her at Easter to share. 


And last but not least, this was a book that I liked the title of but not the content. For 50 cents in a thrift store, I scooped it up and now it will be my sepia themed tangle book. I plan on tangling the cover all over eventually but first I have to learn more about sepia colored tangles and their shading. 

That's all for now. For a how to on thse take a look at my Book Look 3. I give complete step by step instructions on how I made these. They are so fun! Enjoy!

Tuesday, April 1, 2014

New Tangle 'Bluets'


Welcome to another new tangle. I call this one "Bluets" after the flower it was designed after. You can see an example of the tangle being used below. 


An experiment in color. This was fun to play with tho I must say I much prefer tangles in black and white. 


These are the flower, Bluets. They grow all over the woods in Ohio in the spring. I am really looking foward to seeing these this year. 


Though I am not a CZT (Certified Zentangle Teacher), nor do I claim to be, I do knw tangles can be found anywhere. So here is my layout on how to do "Bluets". 


The variations are some of my earlier experiements based off the picture of the Bluets from earlier. The buds look a little like "Fescu" but with some crosses and some darker variations. The freeehand drawing was how I first started to experiement so I included it here. I thought it was a little more time consuming than using a grid but everyone has their preferences and the grid would make it simpler. I am not sure which I prefer. Which do you? Have fun!

New Tangle "'Dipity"

Welcome to my new tangle, "'Dipity". Based off an Iris this tangle came serendipitously together thus the name. 


Pctured are two examples of "'Dipity" in action. I used lines to show the background in the first, and solid black for the background in the second. I love how the shading worked out in the second especially. It sort of tricks the eye. 


Irises grow in my rock garden in Spring and I am always taking pictures. If you do an instagram search for #inspiretangles you will see a lot of pictures I have taken that have inspired me to look for tangles within them. 


The worksheet for "'Dipity" is relatively simple. It is a grid based off of triangles. Maybe your variation would be to fill the petals with black and leave the background blank. Or maybe you are talented enough to not even need the grid. 


A few variations are provided. Again, I am not a Certified Zentangle Teacher nor do I claim to be one. I just figured out a few tangles and thought I would share. I hope you enjoy. If you post your creations on instagram be sure to tag me @stxradley . I would love to see what you do with any of the tangles I have shared. But most of all, have fun!

Tangle Cross Challenge

Recently I have been having fun taking on a challenge created by Sandy Steen Batholomew. She shared an example in one of her books whereby you create tangle cross charts. The idea is a brain stretching exercise that uses your creatiity with the tangles in a new way.


For me it has resulted in a lot of unique combinations and  neat way to learn new patterns that I previoulsy would not have thought to try. 


I tend to prefer more curly and wavy tangles so using a grid or hard straight edges is not something I would gravitate towards. I have also found a new appreciation for some of these tangles I never would have thought to use myself. 


And the combinations are absolutely endless. I really like some of the crossed results more than the original tangle. Maybe it's because I have come up with it myself or maybe it is the uniqueness in them. Either way, this is an exercise I plan to continue. It will help me learn new tangles and continue to stretch me creatively. I like that. 

What coloring tools should I use in a coloring book?

YOU : So Chelsea, what coloring tools should I use?  ME :  I'm glad you asked that random blog reader. The answer is, whatever o...