Showing posts with label DIY fun. Show all posts

Wednesday, April 9, 2014

Coasters anyone?


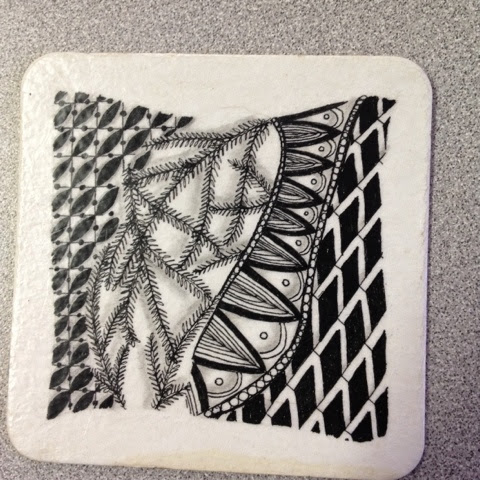
On Amazon when you search for 'zentangle' you get about 20 pages worth of books and supplies. These coasters were one such supply. They are absorbant coasters for around $8 per set of 50. Of course I had to buy them as I was exploring these as an option for crafts this summer. 


The round coasters make the perfect zendala style zentangles.


And the square coasters make the perfect traditional zentangles. 

    
^Please note, the stain on this one is from my daughter spilling my coffee while I was tangleing, not a result of improper sealing.


Measuring about 4" in diameter or 4" square, these tiles are perfect coasters. But how do you protect your artwork? Well, simple, mod podge the top. Be sure to also get mod podge all around the edges too. Allow to dry. Using clear spray paint, seal the top. When this has fully dried you will have a waterproof coaster. No joke. This is the same method I use with tile coasters when I cover them with craft paper. But have fun. Make it your own! 


Did I mention you can tangle on your Starbucks cup too? hehe


Wednesday, April 2, 2014

Book Look Update


I can't get enough of these. They are too much fun to make. I took some old books and turned them into more zentangle kits. 


This one is my favorite. It has multiple pockets for tangling cards and lots of space to hold as many pens or such as I would want. The cover is gorgeous paper I found and even the handwritten paper on the inside is from the same collection. The poem is "The Lark" by Sir Wiliam Davenport. I love it!


This was an old Reader's Digest from 1966. It's makeover is for my mother in law while she takes my father in law to chemo treatments. I know I spelled "mumsie" wrong for the tangle but it is actually perfect since Mumsie is mom's camp name. I will be bringing this to her at Easter to share. 


And last but not least, this was a book that I liked the title of but not the content. For 50 cents in a thrift store, I scooped it up and now it will be my sepia themed tangle book. I plan on tangling the cover all over eventually but first I have to learn more about sepia colored tangles and their shading. 

That's all for now. For a how to on thse take a look at my Book Look 3. I give complete step by step instructions on how I made these. They are so fun! Enjoy!

Saturday, May 18, 2013

Canvas

   At camp we have alot of kids that come that have to learn manners a bit. We thought a friendly reminder in the cabins would be a good idea. My husband found this picture:


I thought that this was really good. I went to a local store and bought several 18x24 canvas frames. Using spray paint for the background, and paint pens for the lettering, this is my result:


I hope this is inspiration for you. Not even the painting part, the words themselves. How often do we think before we speak? And it seems it is a lesson we are continually learning.


Wednesday, April 10, 2013

DIY Book Look 3 (A how to for a secret craft travel kit)


I recently read in one of my latest Zentangle books that the author really loved her Zentangle kit. The picture she shared looked like a little box with a button closure. She likened carrying around and using her kit to having a beloved old book with you all the time. This sparked an idea. I wanted to make my essential zentangle tools portable as well. I had seen on Pinterest where you can take an old book and create hidden storage within. Armed with this knowledge and an idea, I set out to create!


My first step was to gather supplies. An old book, mod podge, the tools I wanted to fit inside, and an xacto knife.


The first thing I did was take off the cover. It was only taped in place so this was simple.


I then marked on the inside with a pencil where I wanted to make my incision. Using the tools I was hoping to fit inside as a guide, I was able to mark the lines accordingly.


No pic here, but first mod podge the outside of the pages and let dry. This will cause them to stick together and stay in place while you cut.

Then, start cutting along your lines on the inside. This is a tedious process as you only get a few pages at a time but well worth it.


Now, mod podge along the inside edge. You want to make sure to get a good solid coating. It may also be a good idea to mod podge the top edge as well to be sure all the pages stay down.


To make sure it all sticks well, put a layer of seran wrap over the glue nice and taut. Be sure to weight it down with something solid. Behold the readily handy applesauce! ;)


Now was the time to choose my paper. I had this stack of K&Company papers which I just loved! They had such fun bright colors!


Tissue paper was next. I thought this pink would suit it well.


You'll be cutting your 12x12 paper in half. Note the direction of your paper before you cut. Also, I want to make a note that for this book an 8x8 paper would have worked as well. Just be sure to use the right size paper for your book: enough so you have flaps to glue down.


Fold the tissue paper in half...


You will now mod podge first the layers of tissue paper, being sure to fit the paper in the grooves of the binding, and then the paper for the cover over top.


(I confess I got so caught up in my project I had to take step by step pictures afterward. Bear with me here.)
When the paper is glued down, flip open the book cover and mark where to cut, as shown. You want to create a space for the corner to form naturally and fold over flaps to glue down.


Once you have glued down your flaps, grab some elastic. In my other posts on book looks, I used my daughter's old headband at one point. I have since bought some 1/4 inch elastic. I cut it to the length of the book plus a little to glue down. This is really just sort of a 'how solid it feels to you' on holding the book closed sort of thing. In the back of the book, use hot glue to first glue your strap (be careful of twisting) and then I hot glued the entire back cover to the book pages.


On the inside, I improvised. I first picked a paper for the left side. This covered my flaps and made a fun background. I also used a fun paper for the background of the book pages where I would be storing my tools. I used hot glue and a pipe cleaner or chenille stem to make holders for my pencil and other tools I didn't want loose in the 'book'. On the left, for my zentangle papers, I had some paper photo corners available and thought they would satisfy the need. Hot glue and voila!


The last step was to come up with a title for my book. A title is not necessary but I thought it would suit my purpose. Zentangle is called 'tangling' when used as a verb. I searched for an old book with the word 'Tangle' in it and after looking through several titles, (some of which I did not want to be associated with) I finally chose this one: 'Tanglewood Tales' by Nathaniel Hawthorne. I proceeded with my fine tip black sharpie to write my title. Highlights were added with a DecoColor extra fine liquid silver opaque paint marker.


I am really pleased with this. It will travel well and be very convenient for when I need it.


My other book look was for an Ereader. Check it out. Jane Austen! Love her!


They certainly look like books on the shelf....


And no one will suspect! Try your hand at it and let me know how it turns out. Mine was geared towards a zentangle kit but any size book (especially a thicker one) will suit the purpose and you don't have to create spots for things to fit so they don't move. Maybe a larger book will allow for more specific compartments for things. The possibilities are endless! Be flexible and explore! Good luck!


Monday, March 11, 2013

DIY Book Look 2 (a how to for ereader book cover)

Since the original book cover for my Kobo ereader did not work I set out to complete another. Determination is a wonderful thing!


Thus I headed to the basement for the box of old abandoned books at camp. Behold! I found a couple of books just the right size!


The one I will be showing you step by step examples of however is the one I am making for a Kindle Fire that the lovely Karlee has. I love to do crafty things for this girl! But the premise is still the same: find a book that is the right size for your ereader!

Well, this is a classic Hardy Boys book obviously. Frown at me all you want for never reading them, but this book is the perfect size for a Kindle Fire.


Open up the book all the way. This book has a binding that can be cut from the book itself. That is why a hardcover book is the best for this.


Now, grab those handy dandy scissors and cut away at the binding! Mwhahahaha! Yes, evil cackling is allowed and even encouraged here. Once you have cut away the binding you should have the book separate from the cover. I haven't found a use for the book itself yet but I am looking. Otherwise throw it out! (Mwhahahaha!)


Karlee chose a beautiful pattern from this mat stack. This paper is regular craft paper and 8x8 in size. This was doable but a tight squeeze. I used the 12x12 paper from a card stock stack for my purple ereader and I would recommend it over this. This still worked fine however.


With the cover paper chosen it was time to choose a tissue paper for the binding. I chose tissue paper because it molds well to the binding and you can glue 'through' it essentially to get a good solid hold. I chose to use first the dark blue to cover any lettering on the binding, and this lovely golden yellow paper for the bright strands in it.


Mod podge is your friend! This stuff is fabulous! Glue your binding first. Glue on the binding, the. The papers, then a layer of more glue. After that is done you can start on the cover.


While I waited for the binding to dry I drew the title on the cover. Karlee had chosen the title 'Safe Haven' by Nicholas Sparks. Good ole fine point sharpie here.


When the binding was dry enough to flip over I cut the excess off the corners and began gluing down the cover on the inside.


When it was dry enough to flip back over I used this DecoColor marker in silver to add highlights to the words and write on the binding.


Now, for the fabric on the inside I used an old corduroy I had lying around. A softer plusher fabric like fleece would work well for this too. Just be sure it is not too thick. You will cut a size slightly larger than the cover.


Now, my personal favorite friend is this little roll of no sew binding. If you want to sew your seems, go right ahead. This was more convenient for me. I folded over the edges and ironed so the seems would line up with the edges of the cover.


Now, on the right side of your fabric is where your ereader will sit. I had only measurements to go with for this one. A kindle fire measures 7.4 x 4.5. I used these to cut a rectangle of thin cardboard, and determine where my holes would go. The elastic I am using for this is 1/4" elastic. I used a headband on the purple cover. Just find what works for you. You will be cutting two holes in each corner for the elastic.


Now, poke the elastic through...


And flip the fabric over.


Now, hot glue the elastic to the backside of the cardboard like so.


And then you are free to hot glue the fabric to the cover. If you want a strap to hold the cover closed when not in use I would also cut and glue that now. When hot gluing the fabric, start at the center in the binding and then glue your sides down. This will give you an even distribution.


As an afterthought I added this little pocket with plain fabric. No sew binding again and hot glue.


To finish, I mod lodged over the entire thing, and then clear spray painted to seal.


I was so excited I had to take it over to Karlee right away!
And guess what?! It fit!


I hope you have been inspired. I think these are beautiful, functional, and I love that we repurposed something old and unwanted. Now, it's your turn! Have at it!


Update: I used a blow dryer to melt the hot glue along the right side of the ereader case. I pried up the paper and glue and pulled out the headband pieces. I then cut and replaced these pieces with the 1/4 inch elastic which seems to be holding up tighter and stronger. Using hot glue yet again I then re-attached the liner and other pieces. The ereader holds in more snug and the elastic is less bulky than the headband elastic. I hope this is helpful to you. 


What coloring tools should I use in a coloring book?

YOU : So Chelsea, what coloring tools should I use?  ME :  I'm glad you asked that random blog reader. The answer is, whatever o...