Showing posts with label DIY home. Show all posts

Friday, September 11, 2015

Trash Can Refresh Diy

So, it's been a while. But if you know me you know I am sporadic at best. The latest intrigue to share is my garbage can. 

(Please excuse the unfinished kitchen closet and mess)

I have had so many compliments on it and you know what? It cost me $3 and some time. Basically I disassembled  my garbage can, took the spraypaint made to bond to plastic, and sprayed away! Once I was satisfied with the coating I was done. I only used one can for this 13 gallon garbage can. You may want to buy two just be safe, especially if you want the coat on the inside of the can. 


Now, I didn't get the inside where the bag is because who sees that anyway? And I didn't get the very bottom, again, because who sees it? But the result is gorgeous. The color I got is called Lagoon. I love the way this adds a pop of color to my kitchen and it made the old stained white nasty looking garbage can go away! 


Seriously, everyone keeps asking me where I got this one. I smile and tell them spraypaint, and their eyes light up with possibilities of their own! Go! Do it yourself! I can't wait to see your result! 

Wednesday, October 15, 2014

Kitchen-Aid Redo

I was bored one day and low and behold, an idea sprang up! You know those dollar store wall decals? Well, you can add them to your kitchen-aid to spruce it up a bit. I like it! 


Saturday, May 10, 2014

Key Rack/Necklace Holder


There is a beautiful and talented young lady in our church who I am getting to know little by little. She has a beautiful voice and what a gift it is! She is graduating high school this week and I was so touched she gave us an invite to her recital and her graduation party.

By now I am sure you know that I will make any gift I can! This was no exception. I took an 8x10 canvas and covered the edges with embossing powder. This particular powder was an antiqued ivory look. I found a 12x12 paper I liked for her. The antiqued look and the music paper was perfect. 


I cut the paper to size, sanded the edges, mod podged the paper to the canvas, and found a calligraphy R online that I liked. Her name begins with R so this was appropriate. I thought the style fit well with the antique/vintage look. I used a gold sharpie marker to draw the R and outlined it with a sepia colored Micron 05. 


Screw some hooks in the bottom... And voila! While this was fairly quick to put together, the fun is in picturing her face. I know she is a Jane Austen fan as well as anything vintage. I used the first letter of her first name because then she could still use it should she get married one day. 

I was so happy with how this came out but I have to admit I was tempted to keep this one. My last name starts with R. But then, I struggle to part with any of my creations. 


Congrats on your graduation Rachel and I hope you enjoy this for many years to come! 

Wednesday, April 9, 2014

Coasters anyone?


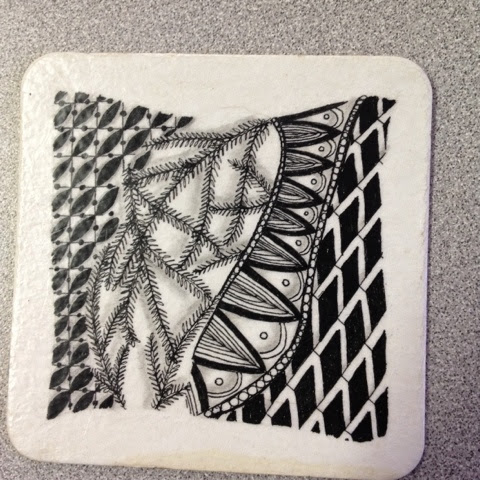
On Amazon when you search for 'zentangle' you get about 20 pages worth of books and supplies. These coasters were one such supply. They are absorbant coasters for around $8 per set of 50. Of course I had to buy them as I was exploring these as an option for crafts this summer. 


The round coasters make the perfect zendala style zentangles.


And the square coasters make the perfect traditional zentangles. 

    
^Please note, the stain on this one is from my daughter spilling my coffee while I was tangleing, not a result of improper sealing.


Measuring about 4" in diameter or 4" square, these tiles are perfect coasters. But how do you protect your artwork? Well, simple, mod podge the top. Be sure to also get mod podge all around the edges too. Allow to dry. Using clear spray paint, seal the top. When this has fully dried you will have a waterproof coaster. No joke. This is the same method I use with tile coasters when I cover them with craft paper. But have fun. Make it your own! 


Did I mention you can tangle on your Starbucks cup too? hehe


Tuesday, October 15, 2013

DIY couch recover


My love seat looks pretty threadbare. Why? Well, there is a fun story behind this couch. It used to belong to the men's lounge at the college my husband and I attended. It was circulated through the men's dorm from room to room as they replaced the lounge furniture. It eventually made it's way to my husband and his roommates who took a house locally. When we got married, it became ours. Fun fact, the couch is as old as I am! I found a label on the bottom that has it's manufacture date. But when we got it, it was looking sad. The cushions were getting frayed and ripped. They were the same material as the rest of the rest of the couch. So I took action and recovered the cushions. 


My first effort was an ivory. Enter baby number one with sharpie markers! Hmm... Bad choice. So my next choice was a dark brown corduroy. This was easier to maintain. Harder to stain too. So I have recovered it in the brown corduroy twice. Now it is several years later and it just hasn't held up to college students visiting and the kids abuse. (Mostly the kids!) so, we stopped at Joann's the other day and I looked at more brown corduroy. It was $12.99 a yard on sale for 40% off. Hmm... I need about 5-6 yards of this stuff... So I looked at the red rage fabric. Low and behold, upholstery fabric! And half off all red tag fabric too! Score! It was originally $29.99 a yard, (yikes!) red tag for $21.99 a yard, (ok, that's a little better) and all red tag was half off so I scored at $10.50 a yard! This fabric was so perfect.


It was the brown I needed, the upholstery fabric that holds up longer, and it even has little flecks of purple and gold all through it! So matched my stuff! 


But, at the cutting counter, there was only 3 yards left, I took a risk, I know, but it turned out perfect! There was just enough to do the whole couch! Even my hubby said it looked sharp! I started by taking my cut pieces and folding them right side down over my cushions and pinned them in place then sewed two seems up the sides like pillow case. Once I turned them right side out it was a mattering stuffing the cushion back into them and hand sewing the seem in the back.


I really like the way this turned out! It looks better and it should hold up longer. I think I want to try my hand at recovering the rest of the couch at some point. Hmmm... Another project to ponder...


Sunday, October 13, 2013

DIY stool

I found this guy in a little antique/thrift shop in my hometown for $5. It has a hinged lid and had a plastic storage tray on the inside. For $5, I could totally redo that sucker and make it my own and that's exactly what I did! 


I took all the pieces apart. Hinges off (in the little plastic bag there) and unscrewed the legs. I got out my spray paint selection from my stash and started with that brown satin finish I have.


Well, a quick stop at Joann's yielded a lovely piece of outdoor fabric in the remnant bin. I also grabbed some bating for a crib size blanket to it and fold and cushion the seat a bit. I started with a stripe evenly stapled across one side, then stapled the stripe evenly across the opposite. The front and back basically. Then I went to work on the sides and stapled them in place. Tucking in the corners was a little tricky but with patience and even some fabric glue you can do it! 


This is the end result. Yep, I spray painted black instead. Not just any black, the black for the plastic furniture! I like the effect. It's not too shiny and it even crackled a bit here and there. Once I screwed all the pieces back on and brought it inside, I decided this is the piece that will sit by our front door for putting on shoes and for storing hats and gloves! Now that was fun!! What's next? 


Sunday, September 29, 2013

Audrey Says...

Welcome to another fave of mine. Audrey Hepburn. Fantastic actress! Beautiful lady. Such poise and grace! Well, she said some fun things too. This one is one of my faves. 


I got out my supplies, canvas board, paint pens, washi tape, wall art from dollar tree....


And now I was off. I spray painted the background black. I cut up my wall art stickers and placed them where I wanted. Heated it all up with a heat gun to be sure the stickers stuck. Then I got out my Art Deco silver paint fine line pen and went to work. I'm pretty happy wth the end result. Now to find a place for display.... Hmmmm....


Saturday, September 28, 2013

For the love of Austen

Yet again I must craft. It always seems to hit me when I least expect it. I see a craft, think of something to do with it, and before you know it I have found myself in the middle of the craft. Well, this one came about because I have been crocheting a lot lately, and as a result I have a cramp in my shoulder. I have had to take a break from my crochet and while searching around the house for something to distract me from my housework, I stumbled across an idea I had put away for another day. 


I have always loved Jane Austen. I love the stories and the quotes from her books are priceless! I had asked my husband a while ago if he wouldn't mind if we used a quote from Jane Austen for a picture I have wanted to put over our bed. I finnally sat down to make this. The quote comes from Mr Knightly in the book Emma, and describes my husband and I perfectly. (At least it seemd a more appropriate quote than Mr Darcy's, "You have bewitched me body and soul." Talk about people asking awkward questions about a picture hanging over your bed...) 


To begin I used a thin sporatic layer of Jade satin spray paint. I then took a few branches from a nearby pine tree outside and layered on some brown lightly. After waiting for these layers to dry, I got out my paint pens and drew out on a separate piece of paper what I wanted to do as far as the layout, first to see how it would look but also to re-familiarize myself with the way a paint pen handles. The style of lettering is all my own. I layered several times with the white pen. I wanted the white to stand out well. I then shadowed with the fine point black pen. I went over again with the white to cover up any mistakes with the black. When I was satisfied with the result I used the pen to splatter white around the painting. For an added touch i used a gold fine line paint pen to add some gilt to the design by drawing in the pine leaves and branches. I am quite pleased with the result. It not only looks earthy, which will satisfy my hubby, but the lettering also turned out better than I thought, satisfying the critic within me. 

Yes, a simple canvas became a favorite piece today. I am happpy to have a favorite quote and author above my bed but I especially love that feeling you get from a craft well executed. 

So, what have you been crafting lately? I hope you find as much joy, satisfaction, and stress relief in it as I do! 


Saturday, May 18, 2013

Canvas

   At camp we have alot of kids that come that have to learn manners a bit. We thought a friendly reminder in the cabins would be a good idea. My husband found this picture:


I thought that this was really good. I went to a local store and bought several 18x24 canvas frames. Using spray paint for the background, and paint pens for the lettering, this is my result:


I hope this is inspiration for you. Not even the painting part, the words themselves. How often do we think before we speak? And it seems it is a lesson we are continually learning.


Wednesday, April 24, 2013

Shadow box/Drawer organizer


Who has leftover wood boxes from those Melissa And Doug stamp sets? You know what I mean. These stamp sets, and other wood sets they sell, come in divided boxes that the kids either make really messy or eventually lose enough pieces to warrant the disuse of the box. In our case, I was tired of the stamps never fitting back in the box the right way.


I decided that a can of spray paint was in order to revive these and make a new use for them.


Once the paint was dry I thought about maybe putting scrapbook paper in the back of the compartments to create some interesting effects. I still might one day. But I like the stark brown look right now.


It made my 'treasures' pop and who cares about what goes behind the makeup in a drawer organizer like this?


Can you think of other ways to use these? I'm sure you can! Don't expect perfection in these boxes tho. If you look closely you'll notice the compartments aren't completely square and the wood not totally smooth. That is because they are hastily put together with soft woods that can bend and mold to the task. This probably saves the manufacturer time since the wood doesn't have to be cut at a precise measurement but it didn't bother me that much. In essence, I bought my kids stamp sets and got a free shadow box/drawer organizer. Win win!

Thursday, April 18, 2013

Repurpose Apothecary Jars

We all have candles and such to make the house smell pretty. What do we do with the jars when we are done with them though? Well, my suggestion is melt down the wax in your microwave, clean out the jars, and find a new use for them. I use one for our q-tips and one for cotton balls. Consider using them to hold candy on the counter or even popping corn. Maybe buy some paint markers and draw a beautiful pattern on the side! (Hmmm, zentangle even?) The possibilities are endless.


Monday, April 15, 2013

Thrifty Repair

At our summer camp we have alot of fun. I especially enjoy making cakes for the staff. It is a way to say thank you for all you do and help them enjoy their special day at camp.

Our camp animal 'friend' is Chad Raccoon, a raccoon we saw at camp several years ago who is very friendly. Haha. So when I saw this little guy at a thrift store last summer I just couldn't resist! One, my husband's family has a bear that they put at your plate when it is your birthday, and two, this little raccoon would fit camp very well. But he had nothing in his hands and it was obvious that something had been there at some point in time.

We are collecting buttons for a craft this summer and while going through them I found these two little buttons. Hot glue made it complete! So cute! Happy Birthday from Chad Raccoon! I can hardly wait to make use of him this summer!

Tuesday, March 26, 2013

Coaster or frame?


Who doesn't love Instagram? If you are a smart phone user and you have this app you can create gorgeous photos simply by changing to a preset filter. And there is even an app for printing these photos called PostalPix. They take a photo, upload it to their network, and print and ship direct to your home! They print the square Instagram prints as well as normal size shots as well. Square prints come in a 9x9 sheet of 2x2 prints, 5x5, and 4x4. Regular prints come in 4x6, 5x7, and 8x10. They also have some specialty items like cell phone covers, aluminum prints, and mouse pads. I have ordered from them numerous times and they have always been fantastic. If an order doesn't show up they are more than happy to print and ship again. They have fabulous customer service which is something special!


Well, I had a stash of 2x2 Instagram shots sitting around waiting for crafts. My friend who is a tile guy had an extra box of tile leftover from a job. I was more than happy to take these off his hands. They are gray and 4-1/2 x 8-1/2. Not a standard coaster size. But I was determined to find a use. I took out these Instagrams and set to choosing which ones to use; a very difficult decision. I settled on pictures that were from my beloved St Croix. (My in laws live there)


Once I had some chosen I set them in order on the tile. I mod podged under them to attach them to the tile, then mod podged over top. If you have outdoor mod podge there will be no further sealing necessary at this point. I don't have this therefore I also like to seal the glue with a layer or two of clear spray paint. This makes them waterproof. With this method you need to be sure to let it dry for several days before you put a mug on top otherwise you will have lovely rings in your paint job, not visible unless they catch the light a certain way. I learned this the hard way and it drove me crazy! Added another layer of clear spray and they are still faintly there but not as bad.


To use as a coaster, don't forget the felt pads underneath to protect you tabletop from the tile edges. To use as a picture frame get a plate stand and set it up. I like it both ways, so you decide, coaster for two? Or picture frame?

Tuesday, March 19, 2013

DIY Coasters


Remember those tiles I bought a while ago? Well, I found some gorgeous paper for my friend Carolina. Her wedding was a peacock theme so no anything I see with peacocks makes me think of her. I try not to overwhelm her with these gifts. I could easily see her getting tired of the peacocks.


Anyway, through the magic of text messaging I sent her pictures of al the papers in the stack and then she picked out four she really liked.


Before I got started I put the little adhesive dots on the back of the tile. People have recommended felt to protect your table from the hard edge of the tile. I prefer these dots because they are so quick and easy.


Cut your paper to size and mod podge away! First a layer under the paper to adhere to the tile....


Then a layer over to seal the paper. If you have outdoor mod podge for this step you may not need to clear spray them to seal. I do not so I prefer a layer of clear spraypaint to help seal the paper from any moisture. Regular mod podge will eventually absorb the water and become sticky again, so seal it!


These are so cute and I am actually a little jealous of these peacock colors! Wish I had them in my house. Carolina, I hope you love them!


What coloring tools should I use in a coloring book?

YOU : So Chelsea, what coloring tools should I use?  ME :  I'm glad you asked that random blog reader. The answer is, whatever o...